Chapter 10 — Creating & Editing Vehicles
The HVE Vehicle Editor is used for creating and editing vehicles for the current case. These vehicles may also be used in other cases.
This chapter describes how to use the Vehicle Editor to create and edit vehicles, beginning with a description of the Vehicle Editor's components.
NOTE: Refer to the next chapter, Vehicle Model Definition, for a detailed description of each Vehicle Model parameter.
Vehicle Editor Components
To use the Vehicle Editor, choose Vehicle Mode using the mode selector. This puts HVE in Vehicle Mode and displays the Vehicle Editor's components:
- Vehicle Editor Dialog — The Vehicle Editor dialog is used for adding vehicles to the current case and to select the current vehicle.
- Vehicle Viewer — The Vehicle Viewer is used for visualizing the current vehicle and editing its parameters.
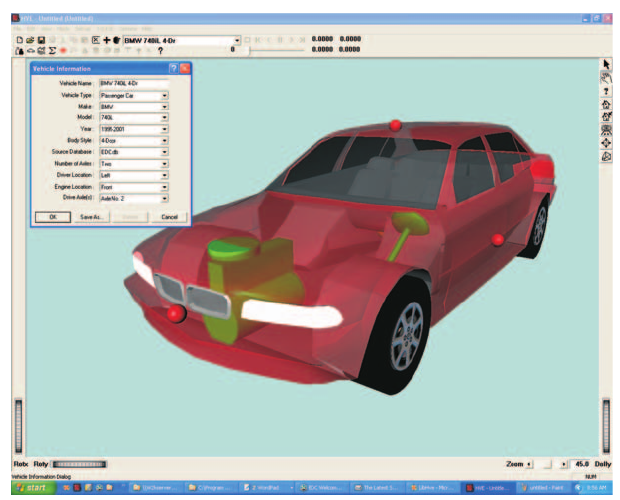 Figure 10-1: Vehicle Editor, Vehicle Information dialog and Viewer.
Vehicle Editor Dialog
The Vehicle Editor dialog is the heart of the HVE Vehicle Editor. It is used to manage (create and edit) all the vehicles in the current case. The Vehicle Editor dialog includes the following functions:
- Add Vehicle — Allows the user to add vehicles to the current case and provides two options: New and Previous. Choose New to add a vehicle from the Vehicle Database; choose Previous to add a vehicle from a previous HVE case. These options are further described below.
- Active Vehicles List — Displays a list of the names for all the vehicles in the current case. The name of the current vehicle is displayed in the minimized list. Click on the combo box to view the full list and select a different name to change the current vehicle in the viewer. Click on the Object Info button on the toolbar to display its Vehicle Information dialog.
- Delete Vehicle — Removes the current vehicle from the case. Select Edit, Delete on the main menu, or click on the Delete button on the toolbar to delete the current vehicle.
NOTE: Pressing Delete deletes the vehicle only from the current case, NOT the database!
NOTE: The Delete button is not selectable if the current vehicle is used in an event.
Vehicle Viewer
The Vehicle Viewer displays the current vehicle. It contains the following components:
- Current Vehicle — Allows the user to visualize the current vehicle. Also displays the pickable vehicle components:
- Center of Gravity — Clicking on the CG allows the user to edit the sprung mass parameters: Inertias, Move CG, Color, 3-D Geometry File, Contact Surfaces, Inter-vehicle Connections, Belt Restraints, Airbag Restraints, Aerodynamic Drag, Body Torsion.
- Wheels — Clicking on a wheel allows the user to edit the suspension, tire and brake at the selected location. The x,y,z wheel location (relative to the CG) may also be edited.
- Exterior — Clicking on the exterior spheres allows the user to edit the exterior dimensions and structural stiffness.
- Brake Master Cylinder — Clicking on the brake master cylinder allows the user to edit the master cylinder or compressor properties.
- Steering Wheel — Clicking on the steering wheel allows the user to edit the steering system properties.
- Engine — Clicking on the engine allows the user to edit the drivetrain properties.
- Viewer Controls — Allow the user to Rotate, Pan, Zoom and set the current Pick Mode (see Chapter 2 for details on using the viewer controls).
NOTE: Although every vehicle's properties are defined using the Vehicle Editor, vehicles are not positioned using the Vehicle Editor. The position of a vehicle in an event is an event-related issue, and is performed using the Event Editor. Think of it this way: At this point, we don't care if the Buick crashes, rolls over or simply slows to a stop. All we care about is that the Buick weighs 2970 pounds and has other properties of our choosing.
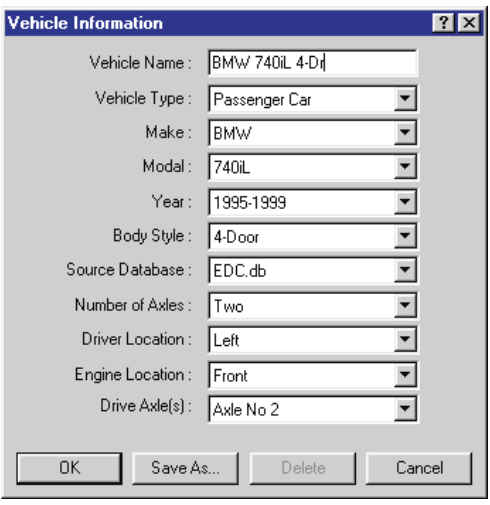 Figure 10-2: Vehicle Information dialog.
Adding New Vehicles
New vehicles are added to the current case using the Vehicle Editor dialog. To add a new vehicle, perform the following steps:
- Click on Add New Object. The Vehicle Information dialog (see the code-verified reference page, Vehicle Information dialog) will be displayed, containing the following options:
- Name — A user-editable field allowing the user to assign a name to the current vehicle. (updated: if no name is entered, HVE generates a default name from the vehicle's year, make and model.)
- Type — Defines the basic vehicle type. The allowable selections are Passenger Car, Pickup, Sport-Utility, Van, Truck, Trailer, Dolly, Fixed Barrier and Movable Barrier. (updated: only types actually present in the installed vehicle databases are listed.)
- Make — Vehicle manufacturer.
- Model — Vehicle model.
- Year — Model year.
- Body Style — Vehicle body style (e.g., 2-Dr Hardtop, 4-Dr Sedan).
- Choose the Type, Make, Model, Year and Body Style for the current vehicle. Each selection filters the choices available in the lists below it.
The next option list displays the name of the database containing the vehicle. Three options available from EDC are Generic.db, EDC.db and Tutorial.db. When the user extends his/her database, the added vehicles are contained in the user's own database, called User.db (see Save-As below).
NOTE: EDC.db is licensed. Unlicensed users will not be able to add vehicles from EDC.db.
NOTE: The same vehicle Make, Model, Year and Body Style may be contained in more than one database.
The above parameters determine the basic vehicle. However, additional attributes are required to completely define its attributes. These additional attributes are:
- Number of Axles — Allowable selections are None, One, Two or Three. (updated: for a Fixed Barrier, the only selection is None.)
- Driver Location — The allowable selections are None, Right, Center or Left.
- Engine Location — Allowable selections are None, Front, Mid or Rear.
-
Drive Axle(s) — Allowable selections depend on the number of axles: None; Axle 1; Axle 2; Axle 3; Axles 1 & 2; Axles 2 & 3; or All Axles.
-
If desired, click on the Number of Axles, Driver Location, Engine Location and/or Drive Axle(s) to edit these attributes.
- Choose OK to create the selected vehicle and add it to the current case.
The selected vehicle will be added to the Active Vehicles List and become the current vehicle.
(updated: the current Vehicle Information dialog also includes a Wizard... button that starts the Vehicle Wizard for building a custom vehicle. It is enabled for Passenger Car, Pickup, Sport-Utility, Van, Truck, Trailer and Dolly types having 1 to 3 axles; it is disabled for Fixed and Movable Barriers.)
Vehicle Database
The vehicle Type, Make, Model, Year and Body Style are actually keys used to select the current vehicle from the Vehicle Database. These keys provide the basic vehicle definition, while the Number of Axles, Driver Location, Engine Location and Drive Axle(s) provide the exact configuration.
NOTE: You can change the vehicle configuration using these keys!
The Vehicle Editor creates a copy of the selected vehicle for use in the current case. The properties of this vehicle may be edited. Changes made to the current vehicle do not affect the Vehicle Database.
Save-As New Vehicle
New vehicles may be added to the Vehicle Database, thus extending the vehicle library. To add a new vehicle to the database, perform the following steps:
- First, make all required modifications of the current vehicle before saving it as a new vehicle.
- Click the Object Info button on the toolbar for the current vehicle in the Active Vehicles List. The Vehicle Information dialog will be displayed, showing its current database keys.
- Choose Save-As. The Vehicle Save-As dialog will be displayed, allowing the user to enter a new Make, Model, Year and Body Style. A Version and 3-D Geometry Filename may also be entered (see the code-verified reference page, Save As New Vehicle dialog).
NOTE: The 3-D geometry file must exist in the
HVE\supportFiles\images\vehiclessubdirectory. If no filename is supplied, or if the file is not found, the vehicle will be visualized as a simple vehicle body (defined according to Type).
- If desired, enter a Version Number. This field may be used for licensing purposes and/or documentation.
- Choose OK to add the current vehicle to the user's vehicle database.
Adding Vehicles from Previous Cases
The user may also include in the current case vehicles from other cases. This option is useful when another case includes a uniquely modified vehicle which is substantially similar to a vehicle required in the current case.
To choose a vehicle from a previous case for use in the current case, perform the following steps:
- Select Mode, Vehicle, Add and choose Previous. The Previous Vehicle Selection dialog will be displayed (Figure 10-3). This dialog contains two list boxes: Active Cases and Active Vehicles.
- Click on a case name in the Active Cases list box. The Active Vehicles List for that case will be displayed in the Active Vehicles list box.
- Choose a name from the Active Vehicles List.
- Press OK to add the selected vehicle to the current case.
NOTE: You can click on the Object Info button for the vehicle's name in the Active Vehicles List to display its Vehicle Information dialog. However, if the selected vehicle is from a previous case, the database keys are not editable.
Selecting and Editing Vehicles
After a New or Previous vehicle is created, its name is added to the Active Vehicles List. The last vehicle added to the case becomes the current vehicle. The current vehicle is displayed in the Vehicle Viewer and may be edited.
To select and edit any vehicle in the Active Vehicles List, perform the following steps:
- Click on the desired vehicle name in the Active Vehicles List. The selected vehicle becomes the current vehicle and will be displayed in the Vehicle Viewer.
- If desired, click the Object Info button on the toolbar for the desired vehicle in the Active Vehicles List to display its Vehicle Information dialog (described earlier). This allows the user to change the basic attributes of the current vehicle (Name, Type, Make, Model, Year and Body Style). Number of Axles, Driver Location, Engine Location and Drive Axle(s) may also be edited. Press OK to update the current vehicle.
NOTE: If the selected vehicle is from a previous case, the database keys are not editable.
If desired, edit the current vehicle's properties. A vehicle is edited by clicking on its components to bring up data dialogs. To edit the individual vehicle parameters:
- Click on the CG to edit the sprung mass parameters: Inertias, Move CG, Color, 3-D Geometry File, Contact Surfaces, Inter-vehicle Connections, Belt Restraints, Airbag Restraints, Aerodynamic Drag, Body Torsion.
- Click on a wheel to edit the Suspension, Tire, Brake, Wheel x,y,z coordinates (relative to the CG) and Wheel Image for the selected wheel location.
- Click on the front, right, back, left, top and bottom side exterior spheres to edit the exterior dimensions and structural stiffness.
- Click on the brake master cylinder to edit the master cylinder or compressor properties.
- Click on the steering wheel to edit the steering system properties.
- Click on the engine to edit the drivetrain properties.
Each of these data categories is described in detail in the following chapter, Vehicle Model Definition.
Source: HVE User's Manual (Version 5, Seventh Edition, Jan 2006), Chapter 10, pages 10-1..10-8 — updated against source code (HVEINV-64, Physics) 2026-07-05.
← Previous: Section Four: Vehicle Editor | Index | Next: Chapter 11 — Vehicle Model Definition (Part A: Sprung Mass) →