Chapter 27 — Using The HVE Video Interface
Updated Markdown edition of the HVE User's Manual (HVE Version 5, Seventh
Edition, January 2006), Chapter 27, pages 27-1 through 27-12. Verified against the current HVE application source
(HVEINV-64/VideoDlg.cpp, VideoOptionsDlg.cpp, AviWrite.cpp,
CVideoWndPlay.cpp, PlayBackDlg.cpp, hversntview.cpp).
This chapter describes the process of producing high-quality video directly from simulation output using the HVE video interface.
(updated: In the original edition this chapter described routing playback to external video tape recorders. Current HVE records simulation movies directly to compressed AVI files (optionally MPEG, or individual frame image files) using the codecs installed in Windows. The Playback window in current HVE is opened with Video Creator... on the Files menu. The chapter below reflects the current workflow; legacy tape-recorder material is flagged.)
The video interface includes two basic tools:
- Video Options (Video Set-up) Dialog — Opened with the Video Setup button on the Playback (Video Creator) window; used for selecting the video format (movie and/or single frames), movie size, frame rate, video compressor (codec) and output directory.
- Playback Window (Video Creator) — Available in the Playback Editor, used for recording and playing back video results.
Whether recording a new movie or replaying a saved one, these two tools are used. They are described below.
Video Setup Dialog
HVE has a dialog for configuring video output before recording. In the original edition this was described as installing a "video device" (loading device drivers and setting up communication between the computer and an external recorder), much like installing a printer. In current HVE no device installation is required: the Video Options dialog simply configures how the movie file is written.
Figure 27-1 — Video Set-up dialog.
(updated: the current Video Options dialog — resource IDD_VIDEO_2011_UPDATE
in VideoOptionsDlg.cpp — contains the following options:)
- Video Format — Two check boxes select the output format(s):
- Movie — Records the playback to a movie file (AVI). An Overwrite check box controls whether an existing movie file is replaced.
- Single Frames — Writes each rendered frame to an individual image file. A Filename field sets the base frame filename and an Overwrite check box controls replacement of existing frames.
- Compressor — Displays the current video compressor. The Select... button opens the standard Windows compressor-selection dialog listing all codecs installed on the system. If no compressor has been selected, movies are written as "Full Frames (Uncompressed)".
- Video Size — Selects the movie frame size: Default (playback window size), DVD, 480p, 720i, 1080i, 1080p or 4K.
- Recording Speed / FPS — Slider and text field selecting the recording frame rate (frames of simulation output per second of video).
- Output Directory — Selects the directory where movies and frames are
written (by default the
moviessupport-files directory; see Appendix I).
NOTE: The Video Setup options are stored in HVE's configuration file. Therefore, you will not need to set up the options again unless you re-install HVE or wish to change them.
Video Devices (legacy)
The original procedure installed a video output device as follows:
- Choose Video from the Files menu. The Video Setup dialog is displayed, showing the current video setup options.
- If S-Video/Composite Video is not displayed in the Device Name field, click on the Device Name option list.
- Select the desired video device. For real-time movie file recording, choose S-Video/Composite Video. This allowed use of HVE's integrated video output display, sized to match the video format.
- Press OK to activate the selected video device.
(updated: the legacy Video Setup dialog (VideoDlg.cpp) still exists in the
source, but its Device Name, Connect To (Serial 1/Serial 2/Video Out), Test
Medium and Time Codes controls are permanently disabled — external video
devices are no longer supported. Video output is always written to a file.)
Video Compressor
If you wish to compress the recorded movie (strongly recommended — an uncompressed AVI grows very large very quickly), you must select a video compressor. Several video compressors may be present, depending on the software installed on your system.
To select a video compressor, perform the following steps:
- Open the Video Options dialog (Video Setup button on the Playback window).
- Press the Select... button next to the Compressor field. The standard Windows compression dialog is displayed, listing all available codecs. Select the desired compressor. (updated: the original manual instructed users to select the Cinepak Codec, which is long obsolete; choose any modern codec installed on your system.)
- Press OK to activate the selected video compressor.
NOTE: The selected compressor is stored in HVE's configuration file. Therefore, you will not need to set up the compressor again unless you re-install HVE or wish to use a different video compressor.
NOTE: Compressed video sequences are often referred to as "movies".
Playback Controller
Video output is recorded and played back using the Playback Editor's Playback Controller. While using the video interface, there is always a video source and a video destination. The Playback (Video Creator) window allows the user to choose the current video source and destination from two option lists.
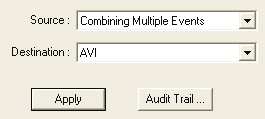 Figure 27-2 — Close-up of the portion of the Playback Window used for
selecting the video source and destination.
Figure 27-2 — Close-up of the portion of the Playback Window used for
selecting the video source and destination.
Video Source
The video source is, as the name implies, the source of the video information. The two possible video sources are:
- Playback Window Name — If a Playback Window has been created, it contains a sequence of frames that may be viewed. The Playback Window normally displays an accident sequence that includes one or more HVE simulation events.
- Movie Filename — If a sequence has been saved as a movie, that
sequence may be played back in the Playback Window. (updated: the source
list includes the default video file (
Default.avi) if one has been recorded, plus every other.avifile found in the movies directory, so a previously recorded movie may be chosen directly.)
Video Destination
For any video source, there must be a destination. The possible video destinations are:
- Playback Window Name — By default, all sources are routed to the current Playback Window for viewing.
- Video File — If the source is the Playback Window, the rendered sequence is recorded to the movie file (and/or single-frame files) configured in the Video Options dialog.
(updated: the original manual listed a third destination, Video Device Name (e.g., a VTR), for routing output to a video recorder. External video devices are no longer supported; the corresponding "S-Video / Composite Video" destination entry is disabled in the current code.)
Recording A Movie
The above video sources and destinations provide the user significant flexibility when using HVE's video tools. To record a real-time simulation movie, perform the following steps:
- Configure the video options (format, size, frame rate, compressor), as described earlier in this chapter.
- Execute the desired HVE simulations (e.g., EDSMAC4, SIMON, EDVSM...) using the HVE Event Editor.
- Choose Video Creator... from the Files menu and create a Playback Window that includes the desired simulations.
- Set the view using either the viewer's thumbwheels or the Set Camera dialog.
- Click on the Source option list and choose the playback window name (e.g., Untitled Playback Window) as the source.
- Click on the Destination option list and choose the video file (AVI) as the destination.
- Press Play.
HVE will record the simulation displayed in the playback window (the Source)
to the Default.avi compressed disk file (the Destination) one frame at a
time until the end of the simulation or until the user presses Pause or Stop.
To view the sequence in real time, perform the following steps:
- Click on the Source option list and choose the movie file as the source.
- Click on the Destination option list and choose the Playback Window (e.g., Untitled Playback Window) as the destination.
- Press Play on the HVE Playback Controller.
The movie is displayed in the Playback Window in real time.
Video File Selection
The video recorder creates a file of the video sequence. These files may be saved and opened using a file selection dialog, similar to other files.
Figure 27-3 — Video File Selection dialog, used for opening and saving compressed video output.
Saving Compressed Video Files
After creating the video sequence, the user can save the video file by a unique filename for future viewing or editing. To save the current video file, perform the following steps:
NOTE: At this point, it is assumed you are in playback mode, have just executed a simulation and the current video destination is the video file.
- Open the Video Setup dialog.
- Choose Save-As. The Video File Selection dialog is displayed.
- Select a filename from the list of existing video files, or enter a new filename.
NOTE: HVE will append the appropriate extension to the name you enter. For example, the filename MyVideo will be saved as
MyVideo.avi. You do not need to explicitly specify a filename extension.NOTE: All video files are stored in the
moviessubdirectory; see Appendix I.
- Press OK.
The compressed video file will be saved by the selected filename.
Viewing Previously Saved Video Files
To replay a previously saved video file, perform the following steps:
- Open the Video Setup dialog.
- Choose Open. The Video File Selection dialog is displayed (current HVE lists AVI and MPEG files).
- Select a filename from the list of existing video files.
- Press OK. The selected filename will be displayed in the Source File field.
- Press OK in the Video Setup dialog.
The next step is to play and view the simulation. Perform the following steps:
- If necessary, choose Playback Mode and add a Playback Window. (You must have a Playback Window in order to play a simulation movie within HVE.)
- Click on the Source option list and choose the movie filename (e.g.,
MyVideo.avi). (updated: saved movies in the movies directory also appear directly in the Source list, so the Open step above is often unnecessary.) - Click the Destination option list and choose the Playback Window.
- Using the Playback Controller, press Play to play the simulation movie.
The simulation sequence will be displayed in real time in the playback window.
NOTE: Because this is a pre-recorded sequence, you cannot change the view. In addition, the simulation time in the Playback Controller is not displayed.
NOTE: You can save this video file using the same procedure as for saving the default video, described earlier.
Creating Multiple Video Sequences
The user will often require a series of simulations recorded back-to-back. Examples include:
- Viewing the same crash sequence from several different perspectives (i.e., driver(s), witness(es), fly-by, general perspective)
- Creating alternative scenarios of a crash sequence (driver's version, witness's version, your version)
To produce a video containing multiple sequences recorded back-to-back, record each sequence to a movie file, then either:
- Record each successive sequence to the same movie file. When you save to an existing filename, HVE asks whether you wish to replace the existing file or append the current video sequence to the existing sequence — choose append to build up a back-to-back movie; or
- Record each sequence to its own movie file and assemble them in a video editing package.
(legacy) On tape-based systems the equivalent procedure was:
- Record the first sequence.
- At the end of the first sequence, pause the VCR (leave the VCR in Record mode).
- Using the Playback Controller, choose the second sequence as the Source.
- Release the VCR's pause button, allowing the VCR to run for a few seconds.
- Using the Playback Controller, press Play to record the second sequence.
- Repeat the above steps for each sequence to be recorded.
Step-by-step Examples
The following examples illustrate the use of the HVE Video Interface to perform a complete and inter-related set of video output tasks.
Example 1: Recording the current simulation in real time in the Playback Window
Video compression allows the user to view a sequence in real time in the current HVE Playback Window. The obvious advantage of this approach is time savings; the recording may be previewed before it is distributed.
To create a real-time simulation movie, perform the following steps:
- Create a Playback Window (Files menu, Video Creator...) that includes the desired simulations. Set the view using either the viewer's thumbwheels or the Set Camera dialog.
- Choose the Playback Window name (e.g., Untitled Playback Window) as the source.
- Choose the video file (AVI) as the destination.
- Press Play.
HVE will route the simulation in the Playback Window (i.e., the source) to the computer hard disk using the video compressor (i.e., the destination) one frame at a time until the end of the simulation or until the user presses Pause or Stop.
NOTE: HVE automatically sends the video to a default filename (
Default.avi) in the movies subdirectory of your HVE support files. For more information, see the next example.
Example 2: Save the current compressed video file
The compressed video created in Example 1 (above) is saved in a default file. If the user wishes to save the file for later viewing and editing, the file may be saved using the HVE Video Set-up dialog. To save the current video by a user-defined filename, perform the following steps:
- Create a compressed video as described in Example 1, above.
- Open the Video Set-up dialog.
- Choose Save-As. The Video File Selection dialog is displayed.
- Enter or select a filename from the Files list and press OK.
NOTE: If you choose an existing filename, HVE will ask if you wish to replace the existing file or append the current video sequence to the existing sequence.
- Press OK to return to the Playback Editor.
The resulting video file is now saved and is available for later viewing, as described in the next example.
Example 3: Play a previously saved compressed video file
After saving a compressed video file as described above, the video file may be viewed in the HVE Playback Editor. To view the previously saved compressed video file, perform the following steps:
- Create a compressed video as described in Example 1, above, and save it as described in Example 2, above.
- Using the Playback Window, choose the saved video filename as the source (select it directly from the Source list, or open it via the Video Set-up dialog's Open button), and choose the playback window as the destination.
- Press Play.
The sequence in the selected video file will be displayed in real time in the current playback window.
Example 4: Record the current compressed video file to tape (legacy)
On legacy systems with video-out hardware, a saved compressed video file could be recorded to a VTR as follows:
- Create, save and select a compressed video as described in Examples 1–3.
- Optionally, press Play to play the sequence to confirm it is exactly what you want to record.
- Activate the video-out capabilities of your computer (these steps are hardware-dependent).
- Confirm the VTR settings are correct.
- Insert a tape into the VTR.
- Using the Playback Window, choose a video device name (e.g., S-Video/Composite Video) as the destination.
- Press Play. HVE routes the movie (the source) to the selected video device (the destination), displaying it in a specially formatted full-frame viewer designed to work with the computer's video sub-system.
- Start the recording process (i.e., press the Record and Play buttons on the VCR).
- Press the Play button on the viewer to play the movie.
The simulation movie is displayed on the screen as well as recorded on the VTR at real-time speed.
(updated: current HVE has no video-device destination. To put a simulation movie on physical media or another device, record it to an AVI file and use standard authoring/conversion tools.)
For more information about video concepts, see Chapter 26, Video Basics.
Problem Determination
If you are experiencing problems while trying to create a video, perform the following steps:
- Confirm the video options (format, compressor, output directory) are properly set in the Video Options dialog. If a movie fails to record with a particular codec, try a different compressor or Full Frames (Uncompressed). (legacy: on tape-based systems, confirm the video cable(s) connecting the computer's video hardware to the video recorder are properly connected to both devices — in general, the computer's video out is connected to the recorder's video in, and vice-versa — and confirm the video device controls are properly set, per the specification sheets supplied with the computer and video subsystem.)
- Confirm there is sufficient disk space in the output directory — uncompressed movies are very large.
- Refer to Tips and Suggestions (see Chapter 26, Video Basics) for techniques and suggestions on improving the quality of your videos.
← Previous: Chapter 26 — Video Basics | Index