Chapter 15 — Creating & Editing Events
The HVE Event Editor is used for creating and editing events for the current HVE case. These events may also be viewed and combined with other events in the Playback Editor, as described in Section Seven (Playback Editor).
This chapter describes how to set up and execute events. This process is central to the user's goals when using HVE.
NOTE: Refer to the next chapter, Event Model Definition, for a detailed description of the Event Model parameters.
Event Editor Components
To use the Event Editor, choose Event Mode using the mode selector. This puts HVE into Event Mode and displays the Event Editor's components:
- Event Information Dialog — The Event Information dialog is used for adding events to the current case and to select the current event.
- Event Viewer — The Event Viewer displays the current environment and is used for visualizing the current event and editing human and vehicle positions.
- Event Controller — The Event Controller is part of the Event Editor dialog and includes a VCR-like panel of buttons allowing the user to start, stop, reset and play events forwards and backwards.
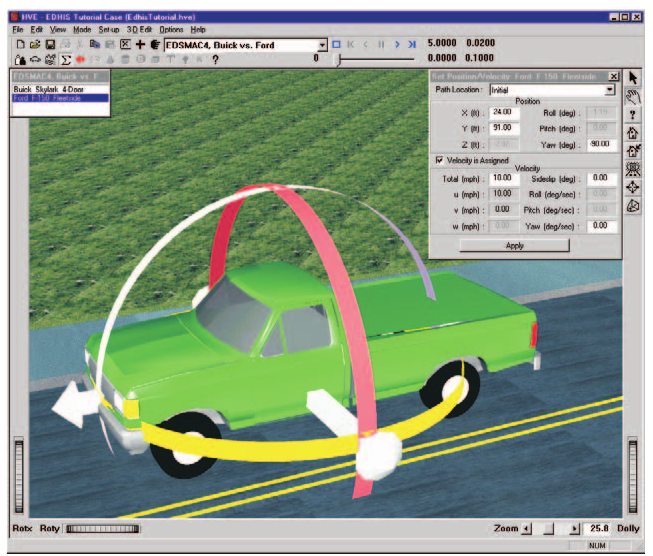 Figure 15-1: Event Editor, Viewer, Position/Velocity dialog and Event Controller.
Event Editor Dialog
The Event Editor dialog is the heart of the HVE Event Editor. The dialog includes the following functionality:
- Add Event — Allows the user to add an event to the current case.
- Active Events List — Displays a list of the names for all events in the current case. The name of the current event is displayed in the Current Event label. Click on the drop-down list to select a different event. Click on the Object Info button to display its Event Information dialog.
- Copy Event — Creates an exact copy of the current event.
- Delete Event — Removes the current event from the case.
NOTE: Delete is not selectable if the current event is used in a Playback Window (see Section Seven: Playback Editor).
Event Viewer
The Event Viewer (see Figure 15-1) displays the current event. The Event Viewer contains the following components:
- Current Event — Allows the user to visualize the humans, vehicles and environment used in the current event.
- Event Humans — Displays each of the humans used in the current event.
- Event Vehicles — Displays each of the vehicles used in the current event.
- Viewer Controls — Allow the user to Rotate, Pan, Zoom and set the current Pick Mode (see the Viewers documentation for details about using the viewer controls).
Position/Velocity Dialog
The Position/Velocity dialog (see Figure 15-2) displays the position and orientation of the selected human or vehicle. It includes the following components (for the current, code-verified field reference see the Position/Velocity dialog page):
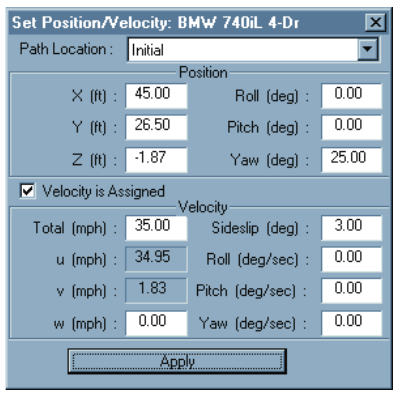 Figure 15-2: Position/Velocity dialog, used for assigning positions and velocities to humans and vehicles in the current event.
- Path Location Listbox — Allows the user to choose a path location at which to place the vehicle. The available path locations are Initial, Begin Perception, Begin Braking, Impact, Separation, Point on Curve, End of Rotation and Final/Rest.
- X, Y, Z Position Fields — Allow the user to enter or edit the selected object's coordinates.
NOTE: If the object is a human occupant, the X, Y, Z fields are relative to the vehicle's CG. Otherwise, the X, Y, Z fields are relative to the earth-fixed origin.
NOTE: If the current calculation model is 2-dimensional, the Z coordinate is assigned using AutoPosition, and is not user-editable.
- Roll, Pitch, Yaw Orientation Fields — Allow the user to enter or edit the selected object's orientation.
NOTE: If the object is a human occupant, the Roll, Pitch, Yaw fields are relative to the vehicle's coordinate axis system. Otherwise, the fields are relative to the earth-fixed axis system.
NOTE: The order of rotations is Yaw, Pitch, Roll. Rotation is not commutative in 3-space!
NOTE: If the current calculation model is 2-dimensional, the roll and pitch orientations are assigned using AutoPosition, and are not user-editable.
- Velocity Is Assigned Check Box — Clicking on this check box allows the user to assign a velocity to the object at the selected position.
- Total Velocity, Vertical Velocity and Sideslip Fields — Allow the user to assign a linear velocity to the object at the selected position.
NOTE: If the object is a human occupant, the velocity is relative to the vehicle-fixed coordinate system. For vehicles and human pedestrians, the velocity is relative to the earth-fixed coordinate system.
NOTE: If the current calculation model is 2-dimensional, the vertical velocity field is not available.
NOTE: The forward velocity (u) and lateral velocity (v) are auto-computed from the total velocity, Vt, and sideslip, β (u = Vt cos β and v = Vt sin β), but remain user-editable. Editing U, V or the Sideslip angle recomputes the other components accordingly.
- Roll, Pitch, Yaw Velocity Fields — Allow the user to enter or edit the selected object's angular velocities.
NOTE: If the object is a human occupant, the Roll, Pitch, Yaw velocities are relative to the vehicle's coordinate axis system. For vehicles and human pedestrians, the velocities are relative to the earth-fixed axis system.
NOTE: If the current calculation model is 2-dimensional, the roll and pitch velocities are ignored and are not user-editable.
Key Results Windows
Key Results windows (see Figure 15-3) display the current value of one or more user-specified variables during execution.
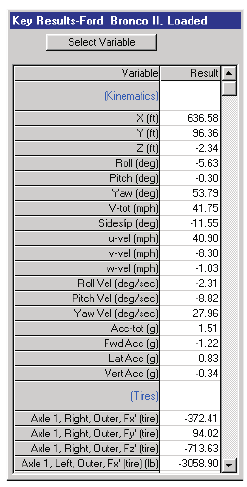 Figure 15-3: Key Results Window, used for displaying important, real-time results during events. Simulation models display a Simulation Key Results window; reconstruction models have a similar window.
NOTE: The Kinematics variables are displayed by default.
For more information about Key Results windows, see Menu Reference, Options Menu.
Event Controller
The current event is executed using the Event Controller, shown in Figure 15-4. The Event Controller has buttons that function much like a VCR controller:
- Reset — Reinitializes the current calculation model for re-execution.
- Rewind to Start — Returns the current simulation to t0.
- Reverse — Plays the current simulation in reverse.
- Stop/Pause — Pauses the current simulation.
- Forward (Play) — Plays the current calculation model.
- Advance to End — Advances the current simulation to the end of the run.
 Figure 15-4: Event Controller, used for starting and stopping event execution. The Event Controller can also be used for replaying previously executed events, both forward and backward.
Adding New Events
New events are added to the current case using the Event Editor dialog. To add a new event, perform the following steps:
-
Click on Add New Object. The Event Information dialog (see Figure 15-5) will be displayed, allowing the user to enter or select the following options (see also the code-verified Event Information dialog page):
-
Event Name — A user-editable field allowing the user to assign a name to the current event.
- Active Humans List — A list of all the active humans created for the current HVE case. Click on one or more humans to be included in the current event.
- Active Vehicles List — A list of all the active vehicles created for the current HVE case. Click on one or more vehicles to be included in the current event.
- Event Humans & Vehicles List — A list of the humans and vehicles to be used in the current event.
NOTE: The order of selection may be important. For example, for a tractor-trailer simulation, the first vehicle is assumed to be the tow vehicle, the second vehicle is towed by the first vehicle, and so on.
- Calculation Model Option Button — An option button displaying the current calculation model (e.g., EDSMAC4, EDVSM, SIMON). Press this button to display the list of calculation models available for selection.
NOTE: Calculation methods are licensed. If you choose a method for which you have no license, HVE will issue a message and your selection will be ignored.
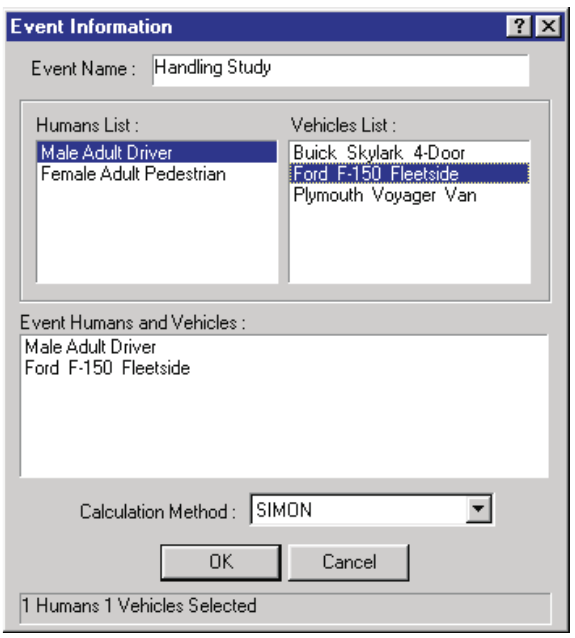 Figure 15-5: Event Information dialog.
- Enter a name for the current event.
- Click on the names of the desired human(s) and vehicle(s) in the Active Humans and Active Vehicles Lists, respectively.
- Click on the Calculation Model options list and choose the desired calculation model.
- Press OK.
Event Verify
When OK is pressed in the Event Information dialog, HVE automatically confirms the selected humans, vehicles and environment are compatible with the selected event. This process is called Event Verification. HVE tests for such things as:
- Are the selected object types compatible with the selected event? For example, you cannot load a human into a single vehicle simulator.
- Are the object's attributes compatible with the selected event? For example, you cannot load a tandem-axle vehicle into a simulator which does not accept tandem axles.
- Are the inter-vehicle connections compatible? For example, you cannot connect a tow vehicle with a fifth wheel to a trailer with a hitch (a kingpin is required).
The event cannot be set up and executed if the event verify returns an error condition.
NOTE: Technically, it is up to the developer of the calculation model to perform these tests and return an error condition so HVE can tell the user what is wrong.
If an error condition is displayed, the user must reselect from the available humans, vehicles and calculation models, or press Cancel.
After compatibility is successfully verified, the calculation model communicates back to HVE, telling HVE which Event Set-up options to make available in the Set-up menu (e.g., Driver Controls, Collision Pulse; see below), as well as which output types it produces (e.g., Messages, Trajectory Simulation, etc.). For simulations, the calculation model also tells HVE which simulation variables (e.g., Sprung Mass X, Y, Z; Tire Fx, Fy, Fz; Suspension dz; Driver Throttle Position; Steer Angle; etc.) it produces. Refer to the following chapter, Event Model Definition, for a complete description of all HVE outputs.
Event Set-up
After selecting the humans, vehicles and calculation method, the next step is to set up the event. This process involves positioning the humans and vehicles in the environment, providing velocities, and entering other event-related parameters, such as damage profiles, payloads and collision pulses.
To set up the event, perform the following steps:
- Click on a human or vehicle in the Event Editor dialog's Selected Objects list box. The selected object will be highlighted, indicating it is the current human or vehicle.
-
Click on Set-up for the current human or vehicle. The following event set-up options are available:
-
Position/Velocity
- Driver Controls (Throttle, Brakes, Steering, Gear Selection, Path Follower, Wheel Data)
- Damage Profiles
- Payload
- Collision Pulse
- Mesh
- Wheels (Blow-out, Displacement, Brakes)
- Accelerometers
- Contacts
- Restraints
NOTE: Normally, the first option you'll choose is Position/Velocity, in order to assign positions and velocities to the selected human or vehicle.
NOTE: Only those options meaningful for the selected human or vehicle will be available in the menu.
NOTE: For studies involving human occupants, you must position the vehicle first.
NOTE: Each of the event set-up options is described in detail in the following chapter, Event Model Definition.
- Enter or edit the data requested by the selected event set-up option, and press OK to accept the data.
- Choose and edit additional event set-up options, as desired.
- Repeat the above steps to set up each human and/or vehicle in the event.
Event Execution
After the event is set up, the next step is to execute it. The current event is executed using the Event Controller (see Figure 15-4). To execute the current event, perform the following steps:
- Press Play to begin execution of the event.
NOTE: If the current calculation model is a reconstruction, it will finish almost instantly. For reconstruction programs, only the Play and Reset buttons are used.
- Press Pause to stop the event momentarily, perhaps to view the current tire forces or other important parameters in the Key Results windows.
- Press Play to continue execution of the event.
NOTE: If you do not intervene, the event will continue to completion.
After the event runs to completion, the buttons will reset, allowing the user to replay the event, forwards and backwards, without performing the calculations. To replay the event:
- Press Rewind to return the humans and vehicles to their initial position.
- Press Play, Pause and/or Reverse, as desired, to view the simulation.
NOTE: If you press Reset, all your current results will be erased! If you wish to save the results for viewing during Playback mode, do NOT press Reset! Use the Pause/Stop pushbutton instead.
After viewing the reconstruction or simulation, the user often wishes to make adjustments to the event and re-execute it. To make these adjustments:
- Press Reset.
NOTE: If you don't press Reset, any event set-up changes will have no effect!
- Choose a human or vehicle, either by clicking on it in the Event Viewer or by selecting it from the Event Humans & Vehicles List in the Event Editor dialog.
- Click on Set-up in the menu bar and choose the desired event set-up option (Position/Velocity, Driver Controls, etc.).
- Make the desired changes.
- Re-execute the event, as described above.
NOTE: For more information about execution, refer to the documentation manual for the selected calculation model.
Selecting and Editing the Current Event
After an event is created (i.e., its humans, vehicles and calculation model have been selected and verified by the Event Information dialog), it is added to the Active Events List. The last event added to the case becomes the current event. The current event is displayed in the Event Viewer and may be edited.
To select and edit any event in the Active Events List, perform the following steps:
- Click on the desired event name in the Active Events List. The selected event becomes the current event and will be displayed in the Event Viewer.
- Optionally, click on the Object Info button on the toolbar to display its Event Information dialog (described earlier; see Figure 15-5). This allows the user to change the basic attributes of the current event (Name, Selected Humans and Vehicles, Calculation Model and Calculation Options). Press OK to update the current event.
NOTE: Updating the current event removes any previous results and reinitializes the event.
- If desired, choose a human or vehicle and edit its event set-up parameters.
- Press Play to re-execute the event.
NOTE: For more information about setting up and executing events, refer to the documentation manual for the selected calculation model.
Copying an Event
After an event is created, set up and executed, a complete copy of the event can be created. This is quite useful for multiple studies of the same event with only a single parameter change (e.g., different steering inputs).
To copy an event, perform the following steps:
- Click on the desired event name in the Active Events List. The selected event becomes the current event and will be displayed in the Event Viewer.
- Click on Edit in the main menu bar and choose Copy. The Copy Event dialog is displayed (see Figure 15-6) with the default event name for the new event (the default name is "Copy Of " + the selected event name).
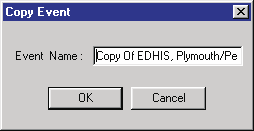 Figure 15-6: Copy Event dialog.
- Edit the event name as desired.
- Press OK.
A copy of the selected event is created. The new copy becomes the current event and is displayed in the Event Viewer.
Deleting an Event
An event may also be deleted. To delete the current event, perform the following steps:
- Choose Edit, Delete. A message box will ask you if you're sure you want to delete the current event.
- Press OK. The current event will be deleted.
Deleting a Vehicle Position
A vehicle position can be removed from the current event. To remove a vehicle position, perform the following steps:
- Select the vehicle position, either by clicking on the unwanted vehicle position or by clicking on any vehicle position and choosing the unwanted position from the Path Location listbox.
- Choose Edit, Delete. A message box will ask you if you're sure you want to delete the vehicle position.
- Press Yes. The selected vehicle position will be deleted.
See also (code-verified dialog references): Event Information · Event Setup menu · Position/Velocity · Driver Controls
← Previous: Section Six — Event Editor | Index | Next: Chapter 16 — Event Model Definition →